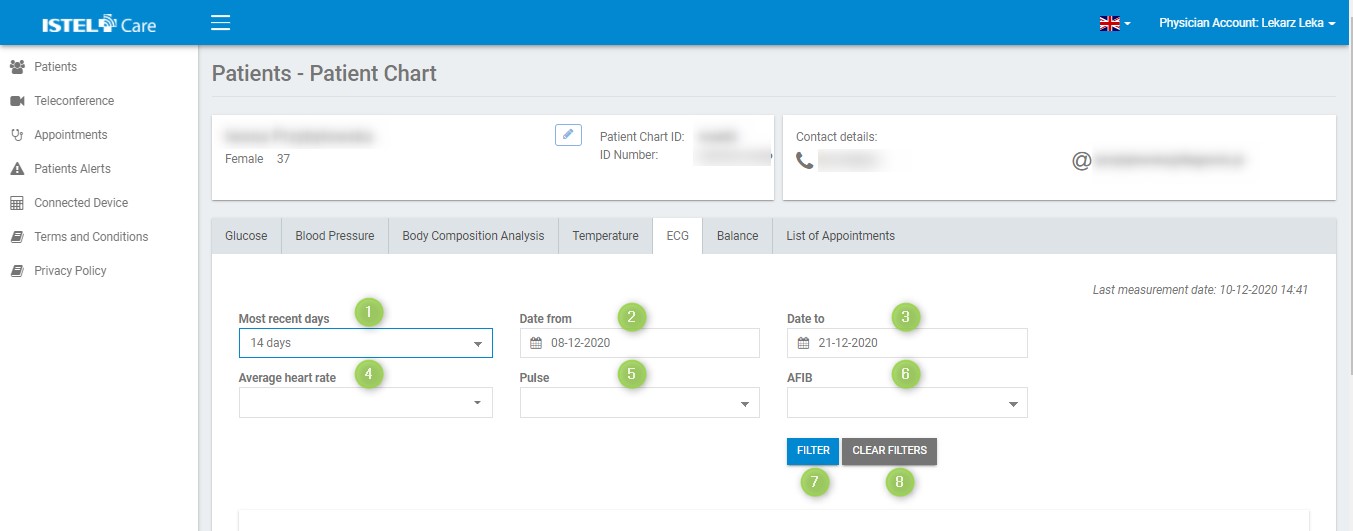
Skip to content

INSTRUCTIONS

FOR DOCTORS

ECG

In this tab you will find the Patient's ECG measurements sent from the Istel ECG application.   

Fig. Setting up filters

FILTERING

In the ECG tab you can filter the results you are interested in.

By default, the system is set to display measurements from the last 14 days. You can change this parameter by clicking on the selection list marked as MOST RECENT DAYS (see 1). You can set filtering to:

  • Any date can be set up
  • 7 days
  • 14 days
  • 30 days
  • 90 days

The fields marked as “Date from” (see 2) and “Date to” (see 3) allow you to select dates from the calendar. 

The “Average pulse rate” multiple-selection list box (see 4) allows you to filter the measurements in terms of the number of heartbeats per minute. Clicking on it provides the following selection options:

  • Up to 100 bpm
  • 101-150 bpm
  • 151-200 bpm
  • Above 200 bpm

The “Average pulse rate” multiple-selection list box (see 5) allows you to filter the measurements depending on whether the pulse was normal or not. Clicking on it provides the following selection options:

  • Normal
  • Abnormal

The multiple selection list “AFIB” (see 6) allows to filter measurements by the information whether atrial fibrillation has occurred during the measurement. Clicking on it provides the following selection options:

  • Not detected
  • Detected

The active filter is blue, inactive is gray.

The FILTER button (see 7) activates data filtering.

The CLEAR FILTERS (see 8) restores the default filter settings.

SUMMARY TABLE 

 
Fig. Summary table and list of measurements

Information included in the table (within the time frame set by the filters):

  1. Total number of measurements (see 1)
  2. Number of “normal” measurements (see 2)
  3. Number of “abnormal” measurements (see 3)
  4. Number of measurements with irregular pulse rate (see 4)
  5. Number of measurements with slow irregular pulse rate (see 5)
  6. Number of measurements with elevated pulse rate (see 6)
  7. Number of measurements with atrial fibrillation (see 7)
  8. Number of measurements with slow pulse rate (see 8)
  9. Number of measurements with elevated pulse rate (see 9)

Below is a list of all ECG results of a given Patient together with the date, time of sent measurement, information about average pulse rate, correct pulse rate and AFIB detection.

Fig. OPEN, DELETE and NOTE buttons in the ECG tab

To see the ECG result in a PDF file click on the OPEN button (see 1).

The Doctor can add a note in the ECG result or to edit and delete the note. Click on NOTE (see 2), enter the information and press the CONFIRM button. To remove a measurement from the list, click the DELETE button (see 3).

Important! You cannot edit or delete the measurements sent by your Physician / Medical Staff to the Istel Care system.

Istel ECG Application

The transmission of ECG test results is carried out using the Istel ECG Application.

Istel ECG Application can be downloaded from Google Play or App Store.

In order to send Patients test results, log in as a Physician/Medical Staff to the Istel ECG Application.

1. Click on the list (Fig.1 ) on the top right corner, and go to "Istel Care Account" Tab (Fig.2).

Fig. 1
Fig. 2

2. Choose your location, then log in as a Physician/Medical Staff (Fig. 3 and 4)

Fig. 3
Fig. 4

To set up the device as the default, follow these steps:

1. Click the list on the top right corner, choose "My devices". (Fig.5 and 6)

Fig. 5
Fig. 6

2. Click "Search" for your device. The ECG Recorder should be switched on, while you are searching it (Fig.7).

Fig. 7

3. Confirm your choice by clicking the name of the device, to which the Application has been connected (Fig. 8) and then "Save". (Fig. 9)

Fig. 8
Fig. 9

Now You can send test results to the Patient's Account in Istel Care System.

Switch on Bluetooth and Location on your mobile phone..

To send test results to your Patient’s Account, follow these steps:

1. Click "Measurement to Istel Care" (Fig.10)

Fig. 10

2. From the available list, choose the Patient for whom you want to take the ECG measurement and confirm your choice with "OK" (Fig. 11). Perform ECG measurement.

Fig. 11

3. When the measurement is finished, click "OK" and confirm that you want to send the test result to the chosen Istel Care Account, by choosing "Yes" (Fig. 12)

Fig 12

4. The submitted test results will automatically appear in your Patient Chart in ECG Tab.